Embarking on your baking journey can feel daunting, especially when traditional pie crusts demand delicate handling and expert rolling. But what if we told you there’s a secret weapon in the baker's arsenal that’s incredibly simple, undeniably delicious, and virtually foolproof? Enter the easy 3-ingredient graham cracker crust. This kitchen marvel is a game-changer for new bakers and seasoned pros alike, offering a blank canvas for countless desserts without the fuss of hand-blending dough or intricate transfers.
Forget the stress of achieving a perfectly flaky pastry. With just three pantry staples – graham crackers, butter, and sugar – you can create a golden, buttery, and perfectly crisp foundation that elevates any pie, cheesecake, or tart. It’s quick to assemble, bakes in a mere 10 minutes (or can even be left unbaked for no-bake delights!), and promises a flavor and texture far superior to anything store-bought. Our goal today is to guide you through crafting a homemade graham cracker crust that will have everyone convinced you spent hours in the kitchen.
Why Choose a Homemade Graham Cracker Crust?
The allure of a homemade graham cracker crust extends far beyond its simplicity. While store-bought crusts offer convenience, they often fall short on flavor and texture. A homemade version, on the other hand, delivers a rich, toasted taste and a satisfying crispness that perfectly complements a wide array of fillings. It's truly a Homemade Graham Cracker Crust: Elevate Any Dessert (Skip Store-Bought!).
- Unmatched Flavor: Freshly crushed graham crackers combined with real melted butter and a touch of sugar create a depth of flavor that a pre-made crust simply cannot replicate. You get a delightful balance of sweet, toasty, and slightly salty notes.
- Superior Texture: Say goodbye to crumbly, overly dry, or disappointingly soft store-bought crusts. Your homemade version will be wonderfully crisp, yet tender enough to cut cleanly, providing the perfect textural counterpoint to creamy fillings.
- Effortless Elegance: This crust is a dream for busy holiday seasons or sweltering summer months when turning on the oven for an hour seems unbearable. It’s incredibly fast to prepare, requiring minimal baking time, and offers an elegant base for everything from classic cheesecakes to refreshing Key lime pies.
- Versatility is Key: Beyond traditional pies, this crust shines as the base for dessert bars, individual tartlets, icebox cakes, and countless cheesecake variations. Its neutral yet inviting flavor profile allows it to pair beautifully with fruit, chocolate, cream, and citrus fillings.
The Magical Trio: Just Three Simple Ingredients
The beauty of this recipe lies in its minimalist approach. With only three core ingredients, each plays a vital role in achieving that perfect balance of flavor and structure.
Graham Crackers: The Heart of Your Crust
For a truly traditional and delicious graham cracker crust, honey graham crackers are your best bet. Their distinct toasted flavor and firm texture lend themselves beautifully to a successful crust. While store brands can work, be mindful that they sometimes result in a blonder, less firm crust with a softer, almost moist texture due to differences in formulation.
However, this recipe is remarkably versatile! Don't hesitate to experiment with different varieties to tailor your crust to your dessert:
- Chocolate Graham Crackers: Ideal for chocolate icebox pies, S'mores creations, or chocolate cheesecakes.
- Cinnamon Graham Crackers: Adds a warm, spicy note perfect for apple pies, pumpkin desserts, or a unique twist on S'mores.
- Digestive Biscuits or Other Cookies: If graham crackers aren't available where you live, many bakers successfully substitute them with digestive biscuits, shortbread, or even vanilla wafers. The key is to achieve the correct crumb consistency and measurement.
No matter your choice, aim for 1 ½ cups of finely ground crumbs, which typically equates to about 12 full graham cracker sheets. A food processor makes quick work of this, but a ziploc bag and a rolling pin work just as well for a satisfying stress-relief activity!
Butter: The Unsung Hero Binder
Melted butter is the crucial binding agent in a graham cracker crust. It coats each crumb, allowing them to stick together when pressed, and helps the crust set firmly once chilled or baked. We strongly recommend using unsalted butter. This gives you complete control over the salt content in your dessert, allowing you to add a tiny pinch of salt separately if desired, which can actually enhance the overall flavor. Beyond its structural role, butter also infuses the crust with a rich, decadent flavor that is simply irresistible.
Sugar: Sweetness and Structure
Granulated sugar provides the perfect level of sweetness, complementing the graham crackers without overpowering the filling. But sugar isn't just for taste; it also plays a supporting role in binding the crumbs. It caramelizes slightly during baking, contributing to the crust's golden hue and firm texture. While granulated sugar is the standard, you can experiment:
- Brown Sugar: Substituting half or all of the granulated sugar with light brown sugar will introduce a wonderful molasses flavor, adding complexity and a slightly chewier texture. This works exceptionally well with pecan pies, banoffee, or spiced fillings.
Whatever your preference, don't skip the sugar entirely. It's essential for both flavor and structural integrity.
Mastering the Press: Tips for a Perfect Crust Every Time
Creating a beautiful, evenly packed graham cracker crust is more art than science, but with a few Unlock the Perfect Graham Cracker Crust: Test Kitchen Tips & Tricks from our experience, you’ll achieve perfection.
Crumbly Beginnings are Normal
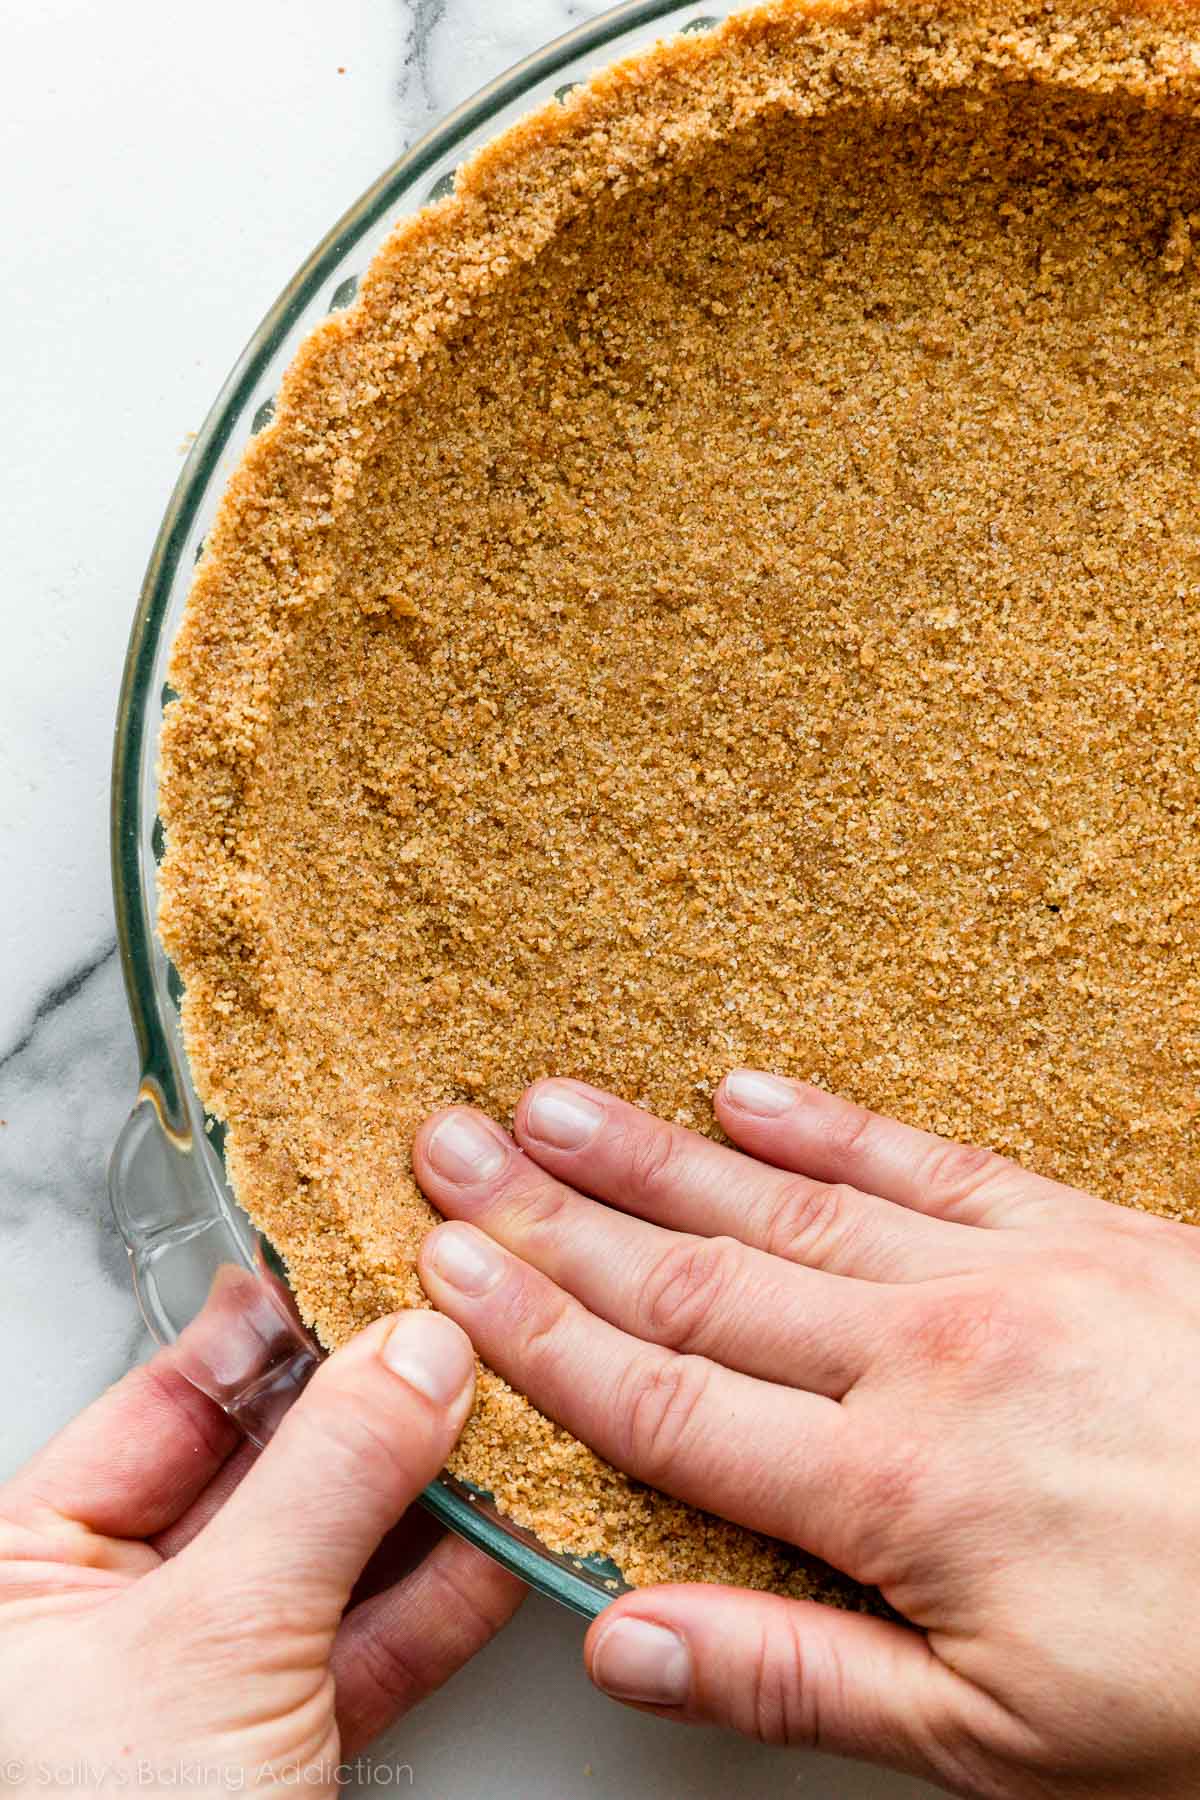
When you first begin pressing the mixture into your pie plate, don't be alarmed if it seems crumbly, sandy, and uncooperative. This is completely normal! The warmth from your hands and the slight pressure will help the butter begin to bind the crumbs together. It takes a little patience and a bit of gentle persuasion, but it will come together beautifully.
The Art of Pressure: Not Too Hard, Not Too Light
There's a subtle balance to striking the right pressure when packing your crust. The goal is to tightly pack the crumbs without compacting them so much that they become rock-hard or difficult to cut. Over-pressing can lead to a dense, tough crust, while under-pressing results in a crumbly, unstable one.
- Technique: Start by distributing the crumbs evenly over the bottom of the pie plate. Use the bottom of a flat-bottomed glass or your knuckles to press down firmly and evenly. Work in sections, pressing just until the crust stops moving and feels firm. Then, lift and move to the adjacent section, repeating the process.
- Sides First, Then Bottom: Many find it easier to pack the sides first, working your way up the plate. This helps define the edges before you tackle the larger surface area of the bottom.
The Rounded Edge Advantage
A common weak point in any pie crust is where the sides meet the bottom. To create a stronger, more visually appealing crust, consider rounding this inner corner:
- How to: Instead of making a sharp, 90-degree angle, gently stack a little extra crumb mixture into that corner and press it into a smooth, rounded curve.
- Benefits: This simple technique significantly strengthens that potential weak spot, making your crust less prone to cracking when sliced. Plus, it gives your finished pie a more polished, professional appearance.
To Bake or Not to Bake?
That is the question! This graham cracker crust offers flexibility:
- Baked Crust: For most pies and cheesecakes, baking the crust for 10-12 minutes at 350°F (175°C) yields a gloriously golden, extra-crisp crust with a more pronounced toasted flavor. This also helps to prevent a soggy bottom, especially with very moist fillings. Allow it to cool completely before adding your filling.
- No-Bake Crust: For certain no-bake pies, icebox cakes, or desserts that are frozen, you can skip the baking step entirely. Simply chill the pressed crust in the refrigerator for at least 30 minutes to firm it up before adding your filling.
Beyond the Basics: Elevating Your Graham Cracker Crust
While the basic 3-ingredient recipe is phenomenal, there are countless ways to customize and enhance your graham cracker crust to perfectly complement your dessert:
- A Pinch of Salt: If using unsalted butter, a tiny pinch (¼ teaspoon) of fine salt added to the crumbs can remarkably boost the flavor of the entire crust, bringing out the sweetness and toasted notes.
- Citrus Zest: For lemon meringue pies, Key lime pies, or other citrusy desserts, finely grated lemon or orange zest can be added to the crumbs. It infuses the crust with a bright, aromatic punch.
- Spices: Beyond cinnamon graham crackers, consider adding a pinch of ground cinnamon, nutmeg, ginger, or cardamom to plain graham cracker crumbs, especially for fall-inspired desserts or fruit fillings.
- Extracts: A few drops of vanilla extract, almond extract, or even a touch of rum extract mixed into the melted butter can add another layer of flavor complexity.
- Different Dishes: Think beyond the pie plate! Use this versatile crust for individual cheesecake cups, bar desserts (pressed into a square pan), or even as a crunchy topping for parfaits and trifles.
Experimentation is part of the fun in baking. Don't be afraid to adjust these simple ingredients to create a crust that's uniquely yours.
Conclusion
The easy 3-ingredient graham cracker crust truly is a revelation for anyone who loves homemade desserts but wants to skip the fuss. Its simplicity, combined with its incredible versatility and superior flavor, makes it an indispensable tool in any baker's repertoire. From your very first crumbly press to that final, satisfying slice, you’ll discover the joy of creating a perfect base that enhances every single bite. So, gather your graham crackers, butter, and sugar, and get ready to bake (or not bake!) your way to deliciousness. Happy baking!
